Monday, January 19, 2015

Mixed Media Laminate Sample- Project One

Hey again, Peeps. I just came home from a wonderful weekend of mixed media near my home town. We get together once a year, and it's so much fun. While I love the Craft Room here at home, it's nice to get away from the day-to-day demands that pull me from my crafting. If you haven't ever gone on a mixed media retreat, I'd highly suggest it.

I'm taking part in a wonderful course called Creative Jumpstart, which can be found here. This year, it is generously sponsored by Liquitex. The course includes short videos just about every day in Jan. and they're great.

So, back to this weekend. I had so much fun just PLAYING! I didn't have an agenda or a specific project. It was great to just explore different techniques.

I started with a laminate sample from my local creative re-use shop. Gosh, that place is filled with so many different substrates for painting and goo-ing up. It's about 5x7"- the perfect size to finish in a small amount of time.

I wanted to use mainly my own stencils, so here's how it looked.

I started with a base of gesso and paint, and then I used my Piano tag stencil. Since I'm a musician, this one is rather meaningful to me.


The came the Data tag stencil. This one gives some whimsy to mixed media, card, or scrapbook projects. 


Then came the Scruffy Crosses tag stencil. The tag stencils are my go-to supplies for retreat weekends since they're so portable and store easily with a book ring.


Then I took out the Mish Mash stencil. Again, this is one of my faves because there's so much going on in terms of texture and design.


Then, the arrows came out. Gotta love me some arrows.


And, don't forget a little doodling, rub-ons, and bling!


Again, thanks so much for checking out my blog!
I do feel a stencil giveaway around the corner!
Fondly, Tami

Wednesday, January 14, 2015

Seconds Stencil Sale!


Hey, again, Peeps. I once had a customer who asked me what I did with my stencils that didn't quite "make the cut". I instantly flashed back to all of the usable stencils in my craft room that weren't really perfect. You see, I'm extremely particular about the stencils that I send out to my Etsy customers. If my products aren't perfect, they end up in the Seconds pile. Sometimes I use them, but most of the time, they just sit in my bin, all lonely and stuff. They were perfectly useful. They just weren't perfect. I sold her a collection, and she loved them. 

So, I decided to sell my seconds in batches. When you order, you will receive a "surprise package". You won't know exactly what you're going to get, but that's half the fun. Your stencil package may include partial stencils, duplicate stencils (because I had forgotten that I already cut that particular design), stencils that were just slightly dented, ones that were used slightly with demonstrations, or those that were cut on "test plastic" (perfectly good plastic on which I tested my cuts). You will receive at least 5 stencils.

But, that's not all. Each package will include a brand, new, "yet-to-be-listed" tag stencil (valued at $5-6), as well as a few mixed media goodies (think vintage goodies like flash cards or card catalog cards, old lace, or some game cards). 

These Seconds Stencil packages will be available as I acquire them, so they'll be listed on a limited basis. 

If you'd like to be notified about my Second Stencil sales as they become available, as well as new design listings and other sales, please e-mail me to be put on my mailing list. I promise not to spam your inbox by sending out no more than 3-4 e-mails per month. 

So, feel free to check out my Etsy shop here.

Fondly, Tami

Saturday, January 10, 2015

Book Paper Tassels Tutorial


Hey, Peeps. I should have been working on an entirely different project, but I was quite distracted and wanted to make these today. No, I haven't planned on doing them for a long time. As a matter of fact, as I was sitting down to work on the other project, I looked over to my right and what did I see...oh look- SQUIRREL!
I have SUCH a problem staying on track once I sit down. RARELY do I accomplish what I set out to do. I guess you can call me an Artiste.

Start with an old book page. This one was about 6x9" or so.


Fold your page in half so that you can cut two tassels at once.


Shhhh!!! Don't tell my daughter, but the herb snipping scissors she bought me don't work well in the kitchen, so I decided to employ them in the craft room. If you don't have this type of scissors (I believe Martha Stewart has them at Michaels), just use single blade scissors.


Before I started cutting, I pulled my paper gently on the edge of my table. This helps later with rolling because it breaks up the fibers. 


Start cutting toward the fold from the open edge, stopping about 1/2 inch from the folded edge.


Do this all the way across the paper. Since it's still folded, you'll be cutting through two layers of paper.


This is what it will look like after the cutting.


Tear the pieces apart at the fold, ending up with two strips of fringed paper. 
Take one piece (reserve the other piece for the next tassel) and line the torn edge close to the edge with some glue. I do like Glossy Accents because it is strong and it dries quickly. Start rolling from the edge, using something round to get it started (I used a skewer).


Keep rolling, and after you've rolled about an inch or so, take a piece of string, ribbon, lace, or jute and add the end of the tie to the area that you're rolling. I usually like to add another dab of glue for extra hold at this point.


Keep rolling, and when you get to about 1" from the end, take the other end of your tie and insert it again, making a loop. Add another extra drop of glue. Finish rolling to the end.


Once you're done, hold it while the glue sets. After it starts to become a little more secure, wrap the end with your choice of Washi tape or ribbon.


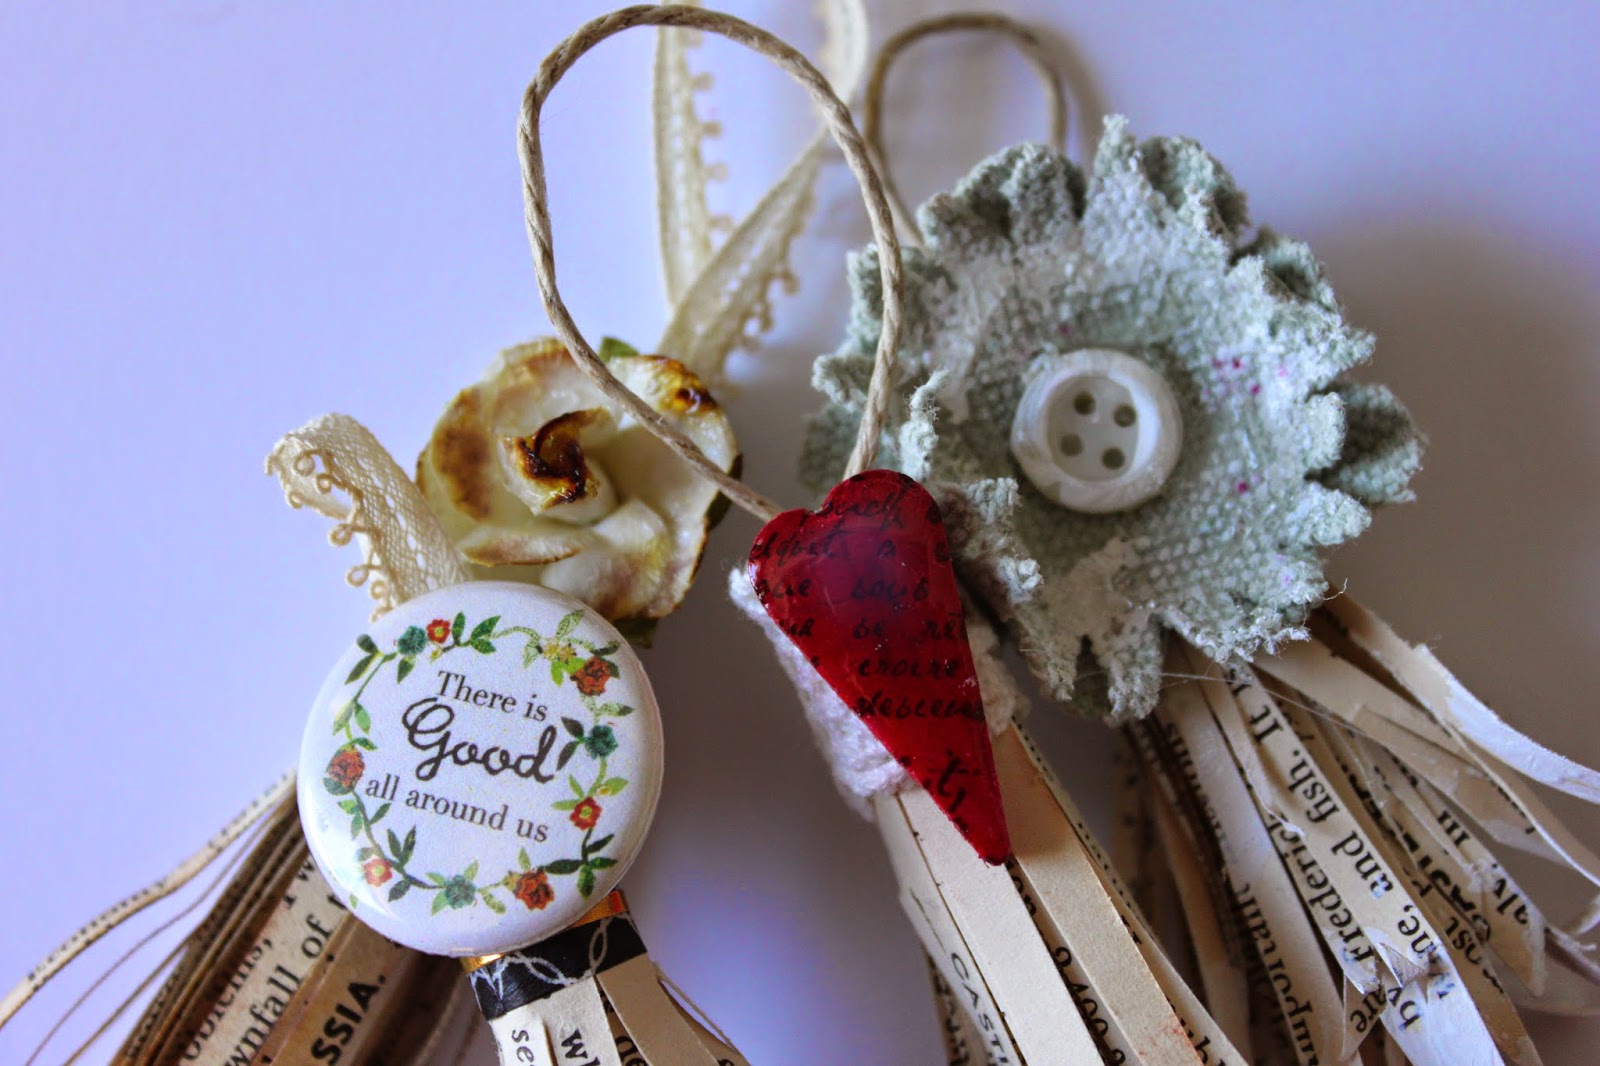
After I made the first one, I thought of a variation. Before rolling the paper (don't tell anyone that you "rolled papers" today, or you might get some dirty looks), cut some of the edges on an angle, about 1/2 inch from the end. Don't go overboard. When the tassel is rolled, this will give a more organic look.


Once the end is taped, take your tassel and beat it up a little bit. Here, I flayed the ends by pushing them down onto my table a bit. This will also make it look a little more natural and not quite as stuffy.


Here's another "undressed" tassel.


The real fun is to embellish them. This is a little flower from the dollar bin at Michaels.


Here's a hand-dyed, die cut flower, made from drop cloth. Love me some drop cloths.


I just added a pin to this one.


I took the edges of one and swished them into some gesso that I spread out on a piece of plastic.


It just dressed the edges up a little more.


With this one, I just brushed the edges onto a distress ink pad and spritzed them with water.


This one was going to have a heart embellie, so I swished the ends into a red ink pad.


Here is my lovely little collection. I'm thinking of using them to dress my altered journals, hang on my tree (yes, my tree(s) are still up), dress up a cute little package, hang onto my cloche, hang from a lamp switch, etc. etc. 


What would YOU do with these? 
And, as always, thanks for reading!
Fondly, Tami

I'm linking to :


Wednesday, January 7, 2015

It's time to use my stencils, Peeps!

Hey, Peeps. this is a quickie post tonight. I realized that while I design and sell lots of stencils, I'm so busy doing that that I often don't get a chance to play with my own toys! So, I decided to use my Mish Mash stencil from my Etsy shop here.

This is actually one of my favorite larger stencils since it has tons of texture. It's almost like several stencils in one because it has so much going on.


So, here are a few things I did with it. I played with some mixed media paper and paint, using the Creative Jumpstart class prompts.

For starters, I took my stencil and just dabbed a few colors of paint through the designs.


After that, I placed the stencil on a brand new piece of mixed media paper and rubbed over and through it with a baby wipe. This accomplished two things. It cleaned my stencil and made another very cool page.


Here's the "rub-through". 


After that, I just added some transparent, high flow yellow paint to the first print. It's all about layers, Peeps, and this one will probably get several more before the week is over. And, sorry for the lighting. It is a dark and stormy night here in PA.


I'll be posting more on these pages in the near future. 
And, thanks again for checking out my blog. I do feel another stencil giveaway coming up.
Fondly, Tami


Tuesday, December 2, 2014

Getting My December Daily Challenge ON!

Hey again, Peeps. Whew! The holidays sure are ramping up, but I'm excited to participate in the December Daily because it keeps me focused on what is REALLY important- spending time in the Craft Room!!!

So, here are my first two pages. The first one was a white on white "suggestion". Since I love white on white, it wasn't a problem at all.

It's always hard for me to start a new journal. I have to get over several things:
1. That it has to be perfect.
2. That there has to be a cohesive theme.
3. That it has to be perfect.

So, with this journal, I'm embracing imperfection. I have several things I want to journal about, and if one doesn't jive with the other, that's OK. This is my PLAY time.

I've gone through some revelations lately, so I'm going to include them this month. I've had to re-define some boundaries concerning some relationships, so I'm going to write about that, as well as celebrating every-day life. I'm also including some materials from this month's Brave Girls Club Soul School, which is a fabulous course. So. Many. Good. Things.

So, in keeping with my new-found love of hand-carved stamps (see blog post here), I wanted to have a lined area for my journaling, so I made a stamp.


So, here is my first page in the journal. Pretty self-explanatory.


Ha! I did end up covering up some mistakes. Kinda ironic.


I often over-think my work. I think it's because since I'm in the business of designing and selling my crafts, that I think everything has to be perfect (like I endeavor to do for my customers). However, sometimes I need to just sit back and have fun.


And here's the page for Dec. 2. I included some interactive journaling cards that open up. This might become a trend.


Here are the cards.


And inside, I wrote about places where I'm peaceful.


Card 2


And inside, how I can seek peace:


And, here is the layout. I've never really liked my handwriting, but it's all a part of who I am, so I'm going to write more instead of relying on a cute font from my printer.


Of course, I had to do a little painting and doodling.


And I included the cute pin that came with my Brave Girls Soul School subscription.


And, I even sat at the sewing machine, which isn't my fave thing to do, but I love the effect. A few pearl embellies later, and I was done. I do have to remember to punch my holes in my pages before I start adding junque, so that I don't cover over those areas. After all, it DOES need to be somewhat functional and put together, not unlike me.


Thanks for looking! Stay tuned for the next few days' layouts!
Fondly, Tami