Tuesday, September 20, 2011

Bar stool- Reverse Stenciling

Hello again, Froggers. The title of my post was going to be "stool", but being a nurse, it just didn't look right, so I changed it.
I started out with a plain oak stool that I bought at a yard sale for about $2. It just needed a few minor adjustments by tightening the screws.
I didn't get a full before pic but you've all seen them.
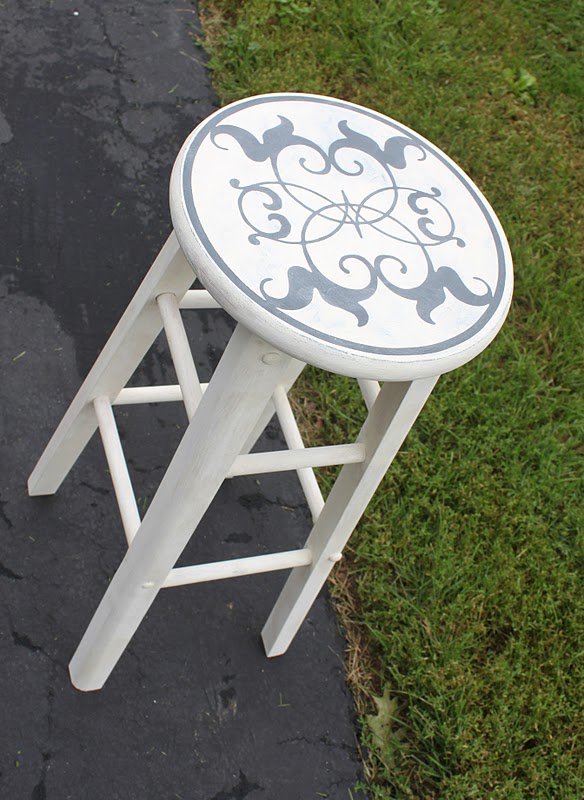
I wanted to do a pattern on the top, and as usual, I just designed a pattern, cut it out with vinyl, and painted over it.
I started out with a black base coat, because that's what color I wanted the design to be (you almost have to think backwards). I used granite chalk paint for this.


I tried to cheat and use contact paper instead of vinyl to increase my profit margin. The contact paper was a little too flimsy. It did work, but it required some more fussing than I wanted to engage in.


Then I painted over the contact paper with old white chalk paint.


Because I was working on a circle, and my design wasn't perfectly symmetrical, I forgot to "square it off" with the legs, resulting in some (*#$@Y#)%   words (or at least thinking about them). So, I painted over it with black and started all over.
It's important to know that I always pull my vinyl up when the paint is slightly wet. The danger in doing this is risking letting go of your vinyl, having it flop back on your design and smudging it. However, those of us who make these kinds of mistakes just call them "new techniques" and call it a day.

Here's what the final looks like:


I'm kinda tickled with it.


Here it is after a light sanding, some clear Briwax, and some buffing.


Yeah. Pretty pleased here.
And, stay tuned for my tutorial on how to use vinyl with your subway art, replete with tips and tricks that I learned after making uber numbers of mistakes!
Fondly, Tami
I'm linking to:
Today's Creative Blog
Not Just A Housewife
House of Grace
The Tip Junkie
Coastal Charm
Blue Cricket Design
Night Owl Crafting
Handy Man, Crafty Woman
Flamingo Toes
Ginger Snap Crafts
Primitive and Proper
Restore Interiors
Primp
Domestically Speaking 
The Shabby Creek Cottage
Beyond the Picket Fence
House of Hepworths
My Romantic Home
Finding Fabulous for Less
Chic on a Shoestring
Designer Garden 
Sisters of the Wild West 
Funky Junk Interiors
Miss Mustard Seed


Monday, September 19, 2011

Chillaxin' in Maine

Hey, Froggers! Well, you caught me at a great time because I'm refreshed from a week in Maine. Yup. It was the first vaca without the kids...well, young adults. We've empty nested (as "empty" as we can be, still paying 2 college payments, picking kids up for breaks, answering phones in the middle of the night about grades, a boyfriend, lack of a boyfriend, etc.). It was a FAB FAB FAB time. The weather was perfect, and HubbyDoc and I did a lot of biking, eating, resting, reading, and crafting (yes, he is a crafter as well).
Since I couldn't take my furniture along (although I almost made HubbyDoc bring home a dresser from a yard sale), I did some other crafting.
So, those of you who don't stamp, you may be bored with the rest of the post. But, for those of you who do, read on, 'cause I think you'll like what you see.
I learned a trick a few years back. I don't like all of my heavy, wooden stamps, and prefer to just have the rubber sitting around for me to mount it on an acrylic block and stamp away. Storage is so much simpler!
Needless to say, I have many un-rubbered blocks sitting around, like this one.


So one day, I was thinking, "They're wood, they're a clean palate, and they're small. They're PERFECT to decorate!" Then I did. Decorate. I love them. They can be tucked in anywhere in your home for a surprise little effect.

 Here's one with Penny Duncan's gorgeous poinsettia.


This next one is done with Tim Holtz's embossing resist technique that is my new fave technique.


Same technique, different stamps and colors:


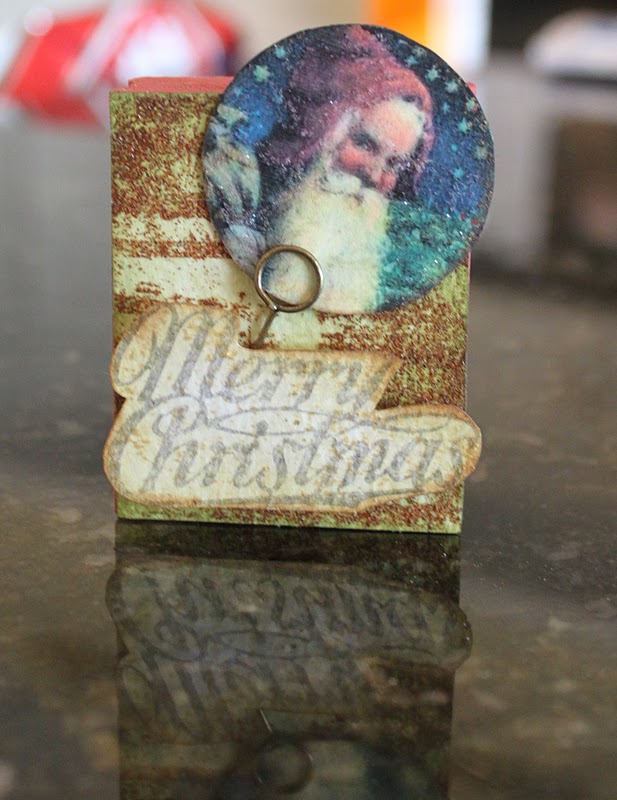
This one has the wonderful vintagy glitter from Stampin' Up.


And here's the back of the one above:


I used a vintage santa that I got from a site on-line. Gotta love freebies!


And, I believe they look nice as a grouping.


Don't you think that these would make lovely hostess gifts during the holidays?
Let me know what you all think. And, if you creative Froggers have any other ideas, please LMK!!!
Now I gotta go do some housework, bill paying, and furniture rehabilitation. I have so much to do today, that I put myself on a strict schedule. And, I'm actually stickin' to it, except for this little diversion. Back to work!
Fondly, Tami
I'm linking to:
A Diamond in the Stuff
Bella Before and After
Coastal Charm
Crayon Freckles
Embellishing Life
Hope Studios
Ladybug Blessings
Make it Monday

Wednesday, September 14, 2011

Wax brushes

Hi, Froggers. I have been enjoying some much needed time with HubbyDoc and have neglected my blog. I know, I know. Send the blog police, why don't cha?
I have been reading about the Annie Sloan Chalk Paint (which I ADORE) and all of the accoutrements and I wanted to mention something.
If you're anything like me, when a new product comes along, sometimes I feel like I just HAVE to have it, especially when my Blog Idols are using it. Being on a fixed income- meaning that all of my income is fixed to going to college payments for 2, I can't afford to be getting the latest and greatest of everything.
Which brings me to wax brushes.
I do admit that when I started using ASCP, I just had to have that expensive Italian wax brush. But, being somewhat frugal (remember the dumpster incident?), I looked around for a similar brush. I checked several craft stores (you know, the ones with the coupons?). I couldn't find anything that looked like the Big Beautiful Brush that "applies wax so beautifully". So, I bought the Big, Beautiful brush when I was at Luckett's (finding it at On a Whim down the street). Miss Mustard Seed, in her tutorial, stated that the brush will shed some fibers along the way. She was right. Every time I wax (my furniture, that is), I have to pull some of those errant little hairs off of my lovely finish.
Then one day, I went shopping with my mom and daughter. We went to a local kitchen outlet that I have not been to in ages. EUREKA!!! As I was in the bakeware section, I noticed a pastry brush. Not as big as the Big, Beautiful Brush, but it was the same type of brush. The fibers appeared natural (which is probably important), so I bought it.
Verdict? I love it. Since I'm not always doing large projects, I don't always need a large brush. As a matter of fact, when my Big, Beautiful Brush is drying, I use this one. When I'm near it and can take a picture, I will.
So, Froggers, continue to think outside of the box.
And, I read somewhere (from a Frogger, of course), that an economical and safe way to clean your wax brush is to soak it in vegetable oil for a while, then clean it with Dawn detergent and hang to dry. I've been doing it for several months now, and it works like a charm!
That's it for now. I must go continue vacationing. Yeah!
Fondly, Tami
P.S. The Little Cheap Brush doesn't shed fibers any more than the Big, Beautiful Brush. Just sayin'.

Friday, September 2, 2011

Dumpster Diving

 Well, Froggers. I have stooped to the bottom. Yup. Dumpster Diving. Well, I didn't actually go in the dumpster. I picked something up beside the dumpster. So, I think that doesn't qualify. Or does it?
You see, a good friend tipped me off briefly before church started 2 Sundays ago. He told me about a chest of drawers that looked like it was in good condition near his daughter's apartment.
And, yes. I did immediately look at my watch. Shucks. Church was starting in a few minutes. Could I just slip out without anyone seeing me?

I succumbed to internal pressure to stay. As my pastor was talking about God's love, I was thinking about Furniture Love. You know. The deal of the century. The piece that didn't get away? That great piece of furniture that you procured for FREE?
Would it still be there? Would it start raining and ruin what was left on the finish? Would someone else get there right before me and snatch it from my clutches?
As soon as church was over and I paid my requisite greetings to my Fellow Christians (although could they call me that after I hadn't paid attention all morning?). A streak was seen as I exited the building. Well... not quite. After all, I really can't run that fast.
HubbyDoc, Youngest, and I drove the Subaru to said location, and lo and behold, it was still there! Joy and Jubilation! We pulled out all of the trash items that were placed in front of it. We jiggled the drawers, rocked the base, and checked the joints. The only thing that was wrong with it was that the runner for the bottom drawer was broken. No problem. I'll just ask my dad to fashion the piece for me and I'll nail it in.
Now, here's the funny part. Since Youngest was in a hurry to go to lunch with a friend, and the Subaru would only hold the chest plus 2 people, I decided to wait for HubbyDoc to drive home, drop off Youngest, and then come back and pick me up. Keep in mind that we had just come from church.
Our church is very casual. However, this particular Sunday, I decided to wear my cute new sandals with heels. Once Hubbydoc went home, I was left, literally standing on a street corner waiting for him to return. In the rain. It was then that I discovered that perhaps I looked less like an innocent Furniture Stealer and more like a Hoochie Mama. As people drove by in my conservative, small town, I received looks like I've never received before.
So, just call me Hoochie Mama Dumpster Diver. 


Here's the chest in its nakedness.


I love wooden knobs. They're so versatile. 


And here's the transformation:


I painted it with a combination of Versailles chalk paint and Paris Grey. There are actually numbers on the chest, but there's not enough contrast for the camera to pick them up. I was a little disappointed that you can't see them well, but perhaps that's the charm of the look. Yeah. I'll pretend it was planned.


I love painting the knobs!


And, last but not least...I was a winner on Miss Mustard Seed's blog! I received a lovely pencil tin:


This is from Abodent, which has delightful little goodies.


AND, I received a $50 gift certificate. Deciding what to use it for was quite difficult, but here's what I finally ordered:


I received 8 of these adorable knobs after paying just a little bit more than $50 since they were shipped from the UK. I can't wait to find the perfect piece to put them on.
Well, that's it for now, Froggers. I hope you have a splediferous weekend! Fondly, Tami

Today, I'm linking to:
The Freckled Laundry
Just a Girl
My Romantic Home
The Shabby Nest
Coastal Charm 
Handy Man, Crafty Woman 
Night Owl Crafting 
Savvy Southern Style 
On Sutton Place
Thrifty Decor Chick
The Shabby Creek
Blue Cricket Design
Someday Crafts
Domestically Speaking
2805 
Beyond the Picket Fence
The 36th Avenue
Knick of Time Tuesday
Primitive and Proper
Miss Mustard Seed
Embracing Change 
Sisters of the Wild West 
Craftomaniac


Monday, August 15, 2011

The Truth about a Cricut

Hey, Froggers! I feel compelled to discuss something that is a little bit dicey.
Several of you have mentioned to me that you want a Cricut. But there is something that you may not know, and I feel compelled to inform you.

About 2 years ago, I bought a Cricut. It was a cold, Feb. day here in the northeast, and I was feeling a little bit cabin feverish. We were expecting The Big One in a few days, and since I'd be snowed in, I thought it would be a great time to buy a craft toy. I had been thinking about a Cricut for a few years, and since there was a great deal on Overstock, I bought one. It was the only "big" purchase that I had ever bought without discussing it with HubbyDoc first, and I didn't feel the least bit guilty (well, maybe a tad). HubbyDoc, in his wonderful, supportive way, was even HAPPY that I bought one. I so love him. ;)

Enter snowstorm. It took me a little while to catch on to the nuances of the machine, but before you know it, I was cutting paper whether I needed to or not. I was never big on die cuts, but I found all kinds of uses for this machine. However, I wasn't really pleased that I had to buy cartridges all the time. I mean, even on sale, they were at least $25 or so.

Enter third party design programs. I found out about SCAL (Sure Cuts a Lot). It was a computer program that I could use with my Cricut to make my own designs. "Hot dog," I exclaimed. Now the sky is the limit! So, I designed away. And discovered free files on line. And shared some of mine with others. And found incredible designers (like Penny Duncan, who makes beautiful stuff). I was having tons of fun.

Then, a dark cloud was seen in the distance (cue screechy violins). There was a rumor that the makers of Cricut were going after third party programs like Make the Cut and SCAL. I knew I was probably safe since SCAL was already downloaded on my computer and worked with my current Cricut. Sure enough, there were legal issues, and Make the Cut and SCAL had to stop selling their products for the Cricut. Now, in my situation, if my Cricut would die and I wanted to get another one, the newer machine would not work with the SCAL anymore. I would have to switch to another type of machine to use my program.

Now I know that I have incredibly creative Froggers. I know that a lot of you won't be satisfied being confined to others' designs. So, if you want to create your own stuff to cut, you're going to have to buy a different machine. There are a few out there that work with these third party programs (Penny Duncan has one of them and has some tutorials on her site).

I just felt compelled to let you know.
Fondly, Tami

Friday, August 12, 2011

My Key Coffee Table. I'm in Love Again.

Well, I hate to tell my hubby, but I'm having an affair...with my new coffee table. Yup. I love this more than life itself. Well...not really, but I'm pretty dang pleased with it.
Firstly, I purchased this table off of Craigslist for a very small price. Score.
It sat in my garage for about 2 weeks until I made the absolute FINAL decision of what to do with it. I was inspired by a table I saw on Sisters of the Wild West. I thought it was SO kewl (my teen daughters HATE when I write cool that way, so that's why I'm doing it).
One of the best things is that this table was totally unfinished. Yup. A furniture crafter's dream. The problem is that when you have a piece like that, the sky is the limit. I become paralyzed with decision making because I want it to be perfect!
One day, I took the plunge and just started. And now, I am in love with the finished product.

I don't have a complete pic of what it looked like in the beginning, but just imagine that it was a plain jane.


The other thing that absolutely tickles me about this project is that all of the keys are my original designs. Since I don't consider myself particularly creative, these designs were a boost to my craft ego.


I cut out the vinyl with my Cricut, placed it on the table, and painted away.


I decided to use some lock designs as well.


This is one of my favorite key designs and is the logo for my new business, which will be called Howsewears:


This is another favorite design. They're almost like my children.


And here is the final product.

The base is painted in Old White chalk paint. It's not distressed. The jury is still out on that.


The project stalled when I couldn't decide which stain to use on the top. I experimented on the underside with just wax, oak stain, cherry stain, and walnut stain. The final decision (with the help of my daughters) was to use a cherry and walnut stain mix. I was so pleased with the final outcome. I like the warmth but I don't like it too dark, so this worked well.


Here's a better view of the designs.


I do have to admit that I might have to enter a 12-step program. Hi. My name is Tami, and I'm an obsessive crafter. Nah. That means I'd have to be willing to change.
I hope you like it.
And, if you're interested in fancy-ing up a table you already have, message me through my Etsy shop here, and I can custom cut vinyl keys to fit your piece of furniture!
Fondly, Tami
Today, I'm linking to:
The Shabby Nest
Remodelaholic Friday
My Romantic Home
Feathered Nest Friday 
No Minimalist Here 
The Frugal Girls 
I Heart Naptime
Flamingo Toes
Sisters of the Wild West
The DIY Showoff
Under the Table and Dreaming
Tatertots and Jello
Between Naps on the Porch 
Dittle Dattle
http://creatingreallyawesomefreethings.com/
Craftomaniac
The Graphics Fairy
The Tattered Tag
Singing Three Little Birds
Be Colorful
Homemaker on a Dime
Making the World Cuter
A Diamond in the Stuff
Coastal Charm
DIY by Design
The Tip Junkie
Primitive and Proper
Night Owl Crafting
Saavy Southern Style
Handy Man, Crafty Woman
Restore Interiors
Today's Creative Blog
Someday Crafts
Beyond the Picket Fence
Blue Cricket Design
French Country Cottage
Chic on a Shoestring Decorating
My Uncommon Slice of Suburbia
Tip Junkie
The 36th Avenue
The Shady Porch
Gingersnap Crafts
Stuff and Nonsense 
The Trendy Treehouse 
The Southern Institute 
Polly Want a Crafter 
It's a Hodgepodge Life 
Embracing Change 
Miss Mustard Seed 
The Vintage Farmhouse 
Kampenlane 
Elizabeth and Co.
Ivy and Elephants
Kammy's Korner
The Vintage Farmhouse

Monday, August 8, 2011

Is it something? Does anyone know what this is???

Hey, Froggers (Friends who are Bloggers)!
I was so excited with my great purchases on Saturday! However, I bought an item that I had no idea what it was. It was so cool that I couldn't pass it up, especially since it was only $2.

It appears to be made of wood, and the scalloped parts are metal, which leads me to believe that it was used more for cutting or making impressions than printing. I'm hoping that it's a Medievil artifact that the Smithsonian has been wanting for their collection. You know. Kinda like "the missing link"? I'd love to be seen on Antiques Roadshow and find out that it's worth a million dollars, and that the market is hot for it right now, and that I'll pretend that I will NEVER sell it because it's so unique, knowing fully well that if it's gonna pay for my daughters' college educations, it's SO last week!


The back has some kind of handles with which to use it.


And here's another view. It's about a square foot or so.


So, what do you all think? I'd love some input.

And, here's my latest project. The image is from the Graphics Fairy. I imported it into my Sure Cuts A Lot and cut it out in vinyl. I placed the vinyl in the center after I painted over the wood in black. It was a little tedious, but I love the process. I painted over the vinyl with Old White Chalk Paint, then lifted up the vinyl. The key to a lovely finish is to sand well (distressing if you so desire) and apply wax. I used a mixture of mostly clear Briwax with a small amount of oak Briwax, which is my new fave.
I adore this finish, and I'm going to have a hard time getting rid of this one.


I think The Graphics Fairy is the bees' knees. She has such beautiful graphics for projects. She ranks up there in my book!


As always, thanks bunches for stopping by. I hope I've inspired some of you to craft on!
Fondly, Tami
And, I'm linking up to
No Minimalist Here
The Shabby Creek Cottage
Beyond the Picket Fence 
House of Hepworths 
Fireflies and Jellybeans