Monday, January 27, 2014

Mixed Media Technique! Textured, Embossed Molding Paste

Hey again, Peeps. I just finished the Online Card Class called "Stenciled", and I've very much enjoyed it. It's a great class even for those who are experienced at using stencils. I learned a few new techniques, and it was a good review of some old ones as well. 
This was inspired by today's class. 
I cut down a piece of heavy weight mixed media paper to just less than what fits on a card (less than 4.125 by 5.5). I like working on panels because if I'm messy, I don't mess up the card base and ruin it. 
Here, I'm using my Hearts Galore Tag Stencil, which you can find in my Etsy shop here.

This stencil has two hearts that are filled with hearts, thus the galore.


I masked off the area that I didn't want to use. Washi or tissue tape is great for this, because it will pull right up.


I slathered on some embossing paste. I wanted this to be very dimensional. 


I didn't want to see any of the little hearts at this point, and that's how I knew I had lots of embossing paste.


I carefully removed the tape and lifted up the stencil to reveal lots of bumpy hearts.


While it was wet, I sprinkled red embossing powder on the paste. Then I set it aside to dry. 

While that was drying, I took my goopy stencil and placed it, goopy side down, on top of a Gelli print paper that I had printed a while back. You can't waste that goopiness, Peeps! I placed a piece of paper over the stencil to rub it into the Gelli print.


I lifted up the stencil to find some lovely little ghost hearts. They weren't absolutely perfect, which is really the look I was going for. That's my story and I'm sticking to it!


I added more embossing powder/


And, here it is, in all it's imperfect goodness.


Then, I went for another "print" with the embossing paste covered stencil. I used a piece of paper to press down.


And this one was a little more "smashy".
I added some more embossing paste, and since the hearts were a little more "open", I decided to try something else. I embossed with red embossing powder first.

Then, I lined up the stencil again, pressed versamark refill into the hearts,


and covered them with this lovely embossing enamel. I love the texture and shine of this product.


Ready to be heated...almost.


One of the hearts wasn't completely covered, so I just colored it in with my embossing marker.


Here it is, all filled in with powder.


And the shine is just so pretty.


I covered a red card with some clear embossing powder over a swirl design.


And I cut out the big heart. I wasn't happy with how "plain" it was, so I just rocked the edge in a Versamark pad, covered the edge with silver embossing powder, and heated away. NOW it looks appropriately blingy.


Shaping up to be a nice embelly.


Lots of dimension.


And here's the final card. I didn't put a sentiment on the front since I think that special "someone" will know what it's about. I'll write something gushy inside.


Thanks for looking, Peeps!
Fondly, Tami
I'm linking to:


Sunday, January 26, 2014

Mixed Media Weekend In LItitz, PA!


Hey, Peeps. I've been busy preparing for my mixed media classes at the Cozy Crop House in Lititz, PA. Here's a little blurb if you're in the area, or plan to be in the area. And if you don't already know about Cozy Crop House, check it out!

Mixed Media Weekend!
 Come join us at the Cozy Crop House in Lititz Pennsylvania! This is an adorable retreat house set up for crafting in an amazing space, complete with yummy meals and cozy sleeping accommodations. 
The weekend of February 14-16, 2014 there will be a jam packed Mixed Media Weekend. 
We'll jump right in on Friday with a little ATC project just to warm up, then after dinner will be the first workshop! Saturday there will be three workshops and one on Sunday. If you are able to stay a little later on Sunday, a bonus workshop is being planned. You will learn a lot of techniques and go home with finished projects.

I'll be teaching along with the wonderfully talented Teresa Fenstermacher. You can check out her beautiful work here. I love her simple, clean lines, use of color, and inspirational designs.
In the first workshop, Teresa will be teaching an altered book:
DESCRIPTION: In this workshop we’ll deconstruct a vintage hard cover book then decorate the cover with paint, gesso, and ink using masks, stencils, stamps, and household items. We will then re-constructing the book placing sleeves in it that hold #8 sized tags. (bonus - you get to keep the vintage book paper!) Now you will have a place to store the technique tags you create when taking online courses!

In the second workshop, she'll be teaching a collaged canvas: 
DESCRIPTION: Let’s make a beautiful 8x10 canvas to keep for yourself or give as a one of a kind gift! Create the background using ephemera, patterned paper, paint, and ink. Learn to create layers with stamps, texture mediums, stencils and rub-ons. We’ll add a girl and a phrase to make your canvas unique. 

I will teach two Gelli Plate workshops:
First class:
DESCRIPTION: Have fun learning how to use a Gelli Plate, which is all the rage in mixed media and paper crafting. Make your own one-of-a-kind monoprints with custom colors using acrylic paints, stencils, masks, and a variety of other texture tools. We will learn a variety of techniques with the plate and use them to make altered tags. You will go home with a 6x6 Gelli Plate, several prints, and a stencil.

My second class will be a canvas banner workshop. 
DESCRIPTION: Use your skills learned in your first class to make a mixed media canvas banner. Learn more techniques, including grungy flowers, playing with glass glitter, and other fun stuff!

Kate Rothacker, owner of the CCH, will also be teaching a Mixed Media and Metal Elements workshop.

If you'd like to join us, please contact Kate at  cozycrophouse@gmail.com 
for more information.
 Contact her soon,  simce we are keeping it "cozy" at just ten students 
and the weekend is filling up fast! 
You can check out the Cozy Crop House at this link

Hope to create with you there!
Fondly, Tami

Monday, January 20, 2014

Stencil Week and Free Giveaway!

Hey, Peeps! Apparently, it's Stencil Week, and I didn't even know it! So, to celebrate, I'm giving away two of my new stencil designs (pictured below). Please just leave a comment by by Fri., Jan. 24, letting me know how you would use them, and you'll receive two of my stencils.
For an extra chance, check my Etsy shop here, and tell me which stencil you like the most (other that the two listed as a giveaway).

Running in Circles
8x10.5 in.

Oval Boulders
8x10.5 in.

Good luck!
Fondly, Tami

1/25/14- Well, Peeps. Thanks to all of you for your comments! I assigned numbers to your posts (the ones who were kind enough to look in my Etsy shop received two entries). I did a very scientific method- "HONEY- PICK A NUMBER BETWEEN ONE AND TEN!" He picked 7, so the lucky winner is.....
PENNY DUNCAN! Woot, woot! 

Tuesday, January 14, 2014

Gesso Layering

Hey again, Peeps. This is just a short post today on what I call Gesso Layering. Mainly, you just take lots of items from your craft room, glue them down to your surface, and cover them with gesso. You may need a few coats if you want to cover an item well. 
This is a card I made. I find the texture gives much visual interest.


I started out with just a piece of cardstock. Then I looked at all the bits that were laying around on my craft table. You know- those little bits from your past 20 projects. 
I also used a Key Mask that's available in my Etsy shop here. I'm pretty obsessed with keys. I keep waiting to get tired of them, but I never do. If you're interested, check out my key table here. I still enjoy this table as much today as the day I designed it.


I ran my card edge with an Inktense block (more on that in a later post). I foresee more playing with these.


I also grazed a Prima flower with the Inktense block.


I went over the flower with a little water to spread the color, and liked it so much that I colored another small one to layer.


A little button, glue, and some twine, plus a sprinkling of micro beads over some Collage Podge, and a sprinkling of Perfect Pearls with a spritz of water.


I truly adore giving small masterpieces as thank you cards. I feel it gives due honor to the person who blessed me. 


I also colored the edge of the cardstock to punch it up a bit.


And, I'm linking to Creative Jumpstart 2014
I hope your day is just fantabulous!
Fondly, Tami

Monday, January 13, 2014

Inspirational Mixed Media Project

Hey again, Peeps. I'm loving doing canvases lately, and this one is no exception. I played with a faux encaustic technique, which was way too much fun.
I started by layering scrapbook papers, dress pattern paper (a "normal" household item, used as suggested by Nathalie Kalbach in her Creative Jumpstart 2014 class, music paper, and vintage flash cards. Next time, I need to not duplicate the flash cards, but I'll take care of that later. 


I added lots and lots of layers, including swirls that I cut out with my Black Cat cougar, canvas tape, a bird cutout, canvas flowers, dot stamps with gesso, and my new Rubber Stamp Peelings technique.


My canvas flowers are an obsession.


This one has two flowers.


You can see the Rubber Peelings Technique under the lower flower. Do you remember my hand-carved stamp post here and here?
Well, I was getting ready to throw the rubber peelings out, and like a true mixed media hoarder artist, I thought, "I bet I can use these...."
So, I glued them onto a piece of cardstock, waited for the glue to harden, then I applied white gesso on top. It gave me some very fun texture.


Here's a decorated side.


A little mica paste for some shimmer, and some stamping on top of the wax for more depth and dimension.


Some more mica paste.


And here you can see the translucency of the wax. I just melted (carefully) some beeswax in my melting pot, then I brushed it onto my canvas using a natural bristle brush (I believe synthetic will melt). I stamped on top with a dot stamp and some gesso.


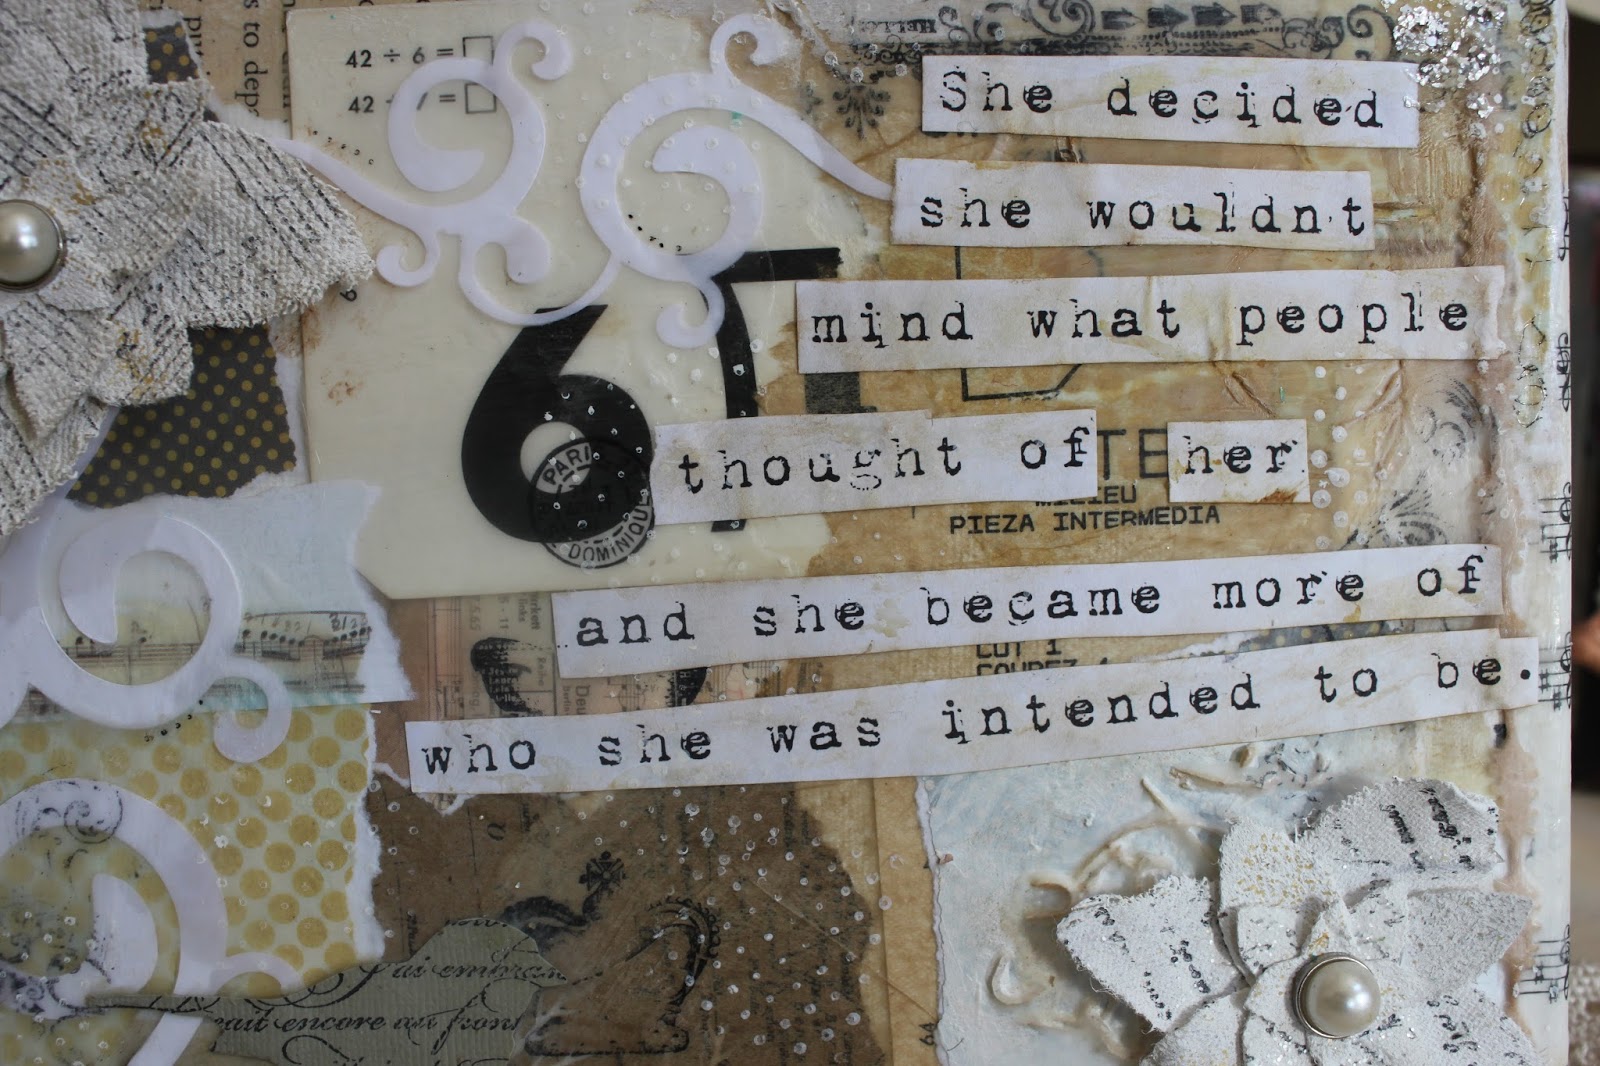
And, here's one of my original sayings. "She decided she wouldn't mind what people thought of her, and she became more of who she was intended to be," born out of something I learned when I turned 40. It was a very valuable lesson, and it has brought me much freedom in my life. Yay!


And, there you have it. A new canvas. 
Thanks for looking again!
Fondly, Tami


Sunday, January 12, 2014

More Techniques!

So, Peeps. I'm just doing a little mixed media fun with my Creative Jumpstart course, which has been great fun. I've learned several very cool techniques which I'm very excited to use. 
Here's one of them.


I started with a wood board, about 5x7. I painted it with some Versailles green chalk paint, and then I used gesso on the flat part.


I just collaged some paper using Collage Pauge. 


Then I dabbed paint onto the paper with bubble wrap. I love how this lightens things up. It's a technique I use all the time.  


Another view of the bubble wrap printing.


One of my favorite techniques is to use Viva Decor Transparent Paint Pens on jute or twine. It looks kind of like raindrops. Here, I just used a glue dot to hold it in place over some hand-dyed crinkle ribbon, then I used my glue gun to permanently adhere it.


A little random stamping with a "spot" stamp.


This adds more texture or visual interest.


Here, I used molding paste through my Rectangular Grid stencil that you can find here.


And here's the paste using my Hexagrid tag stencil.


I used a bird cutout, covered it with black gesso, and stamped with the dot stamp again, just for a little interest.


The dots pulled up a little bit of the gesso, which was a fun surprise.


Then I partially covered the bird with a Viva Decor silver glitter stamping paste.


Here's a canvas flower, covered with gesso, stamped with archival ink, covered with some Distress Stickles, and fastened with a vintage button.


I had some leftover paper straws from the holidays, so I cut them down, cut into them, making little strips, covered them with gesso, and glued them under the flower. This is going to be a new fave!


Another straw under the flower.


I like a theme to my pieces. This one is hope. I have a good friend going through cancer right now, and I've been trying to speak hope into her life. So, I think this will make it to her doorstep.


And here she is, all finished. I can't wait to give it to my friend. I "hope" she likes it.


And, I hope you liked it as well. 
May your year be filled with hope!
Fondly, Tami