Friday, December 21, 2012

Christmas decorations

Hi, Froggers!
Hey, I KNOW you're all out there because my stats tell me someone's lookin', but I don't have any comments, so if you like something you see, I'd love to hear what you have to say. I've had a few spammers lately, so I changed my settings to moderate comments. I hate when that happens. :(


Here's a sign that I did for a customer. 


Actually, there are two.


He had me make one for his kids and one for his mother, because they have a contest. How cute is that! I love making custom pieces like this. It warms the cockles of my heart, whatever that means.

And now, on to Christmas decorations.

I adore decorating my bannister. When we looked at this house, right away, I noticed the lovely long, tall bannister. It's perfect for decorating.
HubbyDoc loves to garden, so I take the fruits of his efforts and use them in the house. These are giant alliums, sprayed silver. The key to a great garland in my house is lots of texture.


I had lots of fun making glittered ornaments. I can never have enough of them.


I love my glittered hearts. And don't forget- that jewelry that you wanted to throw out? Break it up and hang it up (the small medallion with the bauble below the heart)!


The garland is mostly silver, white, and glass, but I like to add a little color in the form of dried flowers.


Dried peonies add a lavish look.


Here's the upper part. I took aluminum flashing, cut stars with tin snips, and ran them through my embosser.


That's it for now. I'll post pics of my tree(s) the next time.And as always, let me know if you're inspired by anything.
Fondly, Tami

Friday, November 23, 2012

Facebook Giveaway

Hey, Peeps! Today, I have a giveaway on my Howsewears Facebook page, which is the following design in vinyl for your wall, door, cabinet door, etc. Feel free to check it out and "like" it. When I get to 150 likes, I will randomly pick a winner. Yes, this is one of my attempts to increase Facebook traffic, but you get a chance to win!
Fondly, Tami

Thursday, November 15, 2012

Vendor show

Wow, it's been a while since I've posted in earnest. I've been crazy busy with preparing for craft shows. It's a whole lot of work, but I love what I'm doing. Here's a sampling:


Here I am at my first show.


A basket of my original vinyl wall word designs. I'll soon be listing on Etsy so stay tuned!


My little trees with glass glittered stars.


My glass glittered ornaments. I love 'em.


And, I'm diggin' the white on white look. I believe this is going to be a new trend.


Stay tuned, Peeps. I'll soon be posting some tips about attending craft shows as a vendor. After my next show, which is tonight! Yikes!
Fondly, Tami

Monday, October 29, 2012

Riding Out Hurricane Sandy

I'm just heartbroken for those on the shore during this terrible storm. Praying that lives are spared. We're riding this out here in SouthEastern PA, specifically Lititz. It's a scary time, but we still have power. We're waiting for the worst of it to be over, which won't be until tomorrow sometime. Please consider praying for our East Coast. Fondly, Tami

Tuesday, September 4, 2012

Ikea Table Re-furb and a Word about Briwax

So, I didn't know this table was an Ikea table until I had to tighten a bold, and realized I needed the Little Ikea Bold Tightener Thingy, which HubbyDoc so conveniently had in his tool box. After minor adjustments and lots of sanding, I ended up with this:

 (Sorry for the blurriness. The camera had just come out of the AC into the lovely, steamy miasma*)

I'm loving the different drawers on both sides.


This is my attempt at an artistic shot. You know. The "diagonal approach".


Now, there has been a lot of blog activity lately concerning making your own chalk paint vs. buying it, CeCe Caldwell’s vs. Annie Sloan, cost, latex vs. chalk, etc. And, I’ve seen some comments presented in a vituperative* manner…over PAINT. Sheesh!
So, if you disagree with me about what I’m going to say, be nice! I’m not getting paid by anyone to endorse anything. Just sayin’.
I just recently bought some Annie Sloan clear wax, mainly because I wanted to see if the effects would be any different than when I use Briwax.
Final verdict? I didn’t like it any better. I used it on the Queen Anne table that I re-furbed, and it applied just like Briwax and buffed just like Briwax. The only real difference was that the Annie Sloan wax doesn’t have noxious fumes, and the Briwax can get a little stinky.
And, the Briwax is about $9 cheaper per can.
Bottom line? I’m saving my AS wax for when it gets cold outside and I have to wax inside this winter.

Now, back to our regularly scheduled programming.
Here's how I transformed this piece:
1. I sanded the top, using a palm sander, to remove the sheen and top coat of whatever they use. I made sure that I sanded the whole top down to the bare wood.
2. I used a base coat of ASCP Emperor's Silk.
3. I painted on a coat of ASCP Old Olive.
4. I brushed a coat of Antique Mahogany Briwax on the Old Olive and then buffed.
5. I sanded some random areas to reveal the Emperor's Silk.
6. Then I did the really fun part. I rubbed several coats of the Briwax on the sanded wood top, revealing the lovely wood grain.
I hope this inspires all you Froggers to transform something just plain useful into something useful and pretty.
Fondly, Tami


*words learned while helping my daughter study for the SAT.
I'm linking to:
DIY by Design 
Primitive and Proper

Thursday, August 30, 2012

Updated Queen Anne Tables

I've been living with these tables for a long time, just waiting for the day when I could lighten them up. Darkeness, Oh how I hate you.


Don't get me wrong. I really liked this table at one time, when they were affordable while I was a young single nurse. I was able to buy them at an affordable price. They were in good shape, but my tastes have changed dramatically, and I want to lighten things up.


Here is the dramatic difference after just a few hours of work.


Another side by side.


Here's my favorite part. I sanded the top to get all of the dark color off, revealing a beautiful wood, ready to be waxed with my favorite Oak Briwax.


Here's the beautiful top. I will add a few more wax coats to give it some more durability. The legs were painted with ASCP in Old White, and finished with a light distressing and a coat of oak Briwax. I can't wait to do the second one, but alas, they may have to find their way to Building Character or a new venture in Lititz, which I will tell you about very soon.
Thanks for checkin' in!
Fondly, Tami
I'm linking to;
Miss Mustard Seed
Beyond the Picket Fence

Saturday, August 18, 2012

Cute Little School Chairs

Hey, Froggers! I'm sorry for the delay in posting. I have had my hands in so many projects that my head is spinning. I'm gearing up to get my inventory up and running so I can do a few craft shows this fall. Perhaps I should have started in May! Uh. Oh.
Here's what I've been working on lately.
I started with these four adorable chairs. I found them at a yard sale (actually there were 6, but I'm saving 2 for another project). They came from my small town local elementary school that had been torn down and re-built. I'm just sorry, but I can't imagine any new chairs that would be cuter than this!


Since they were so adorable in and of themselves, I didn't want to change them up much, but of course, I had to paint them a little!


I used my favorite stencil technique. Even though I used Annie Sloan Chalk Paint in Graphite, and you're not supposed to have to sand the wood, this wood was pretty smooth. So, after I painted them, I kept the stencil vinyl on top, mixed some graphite with clear Briwax, kind of slathered it on, waited, pulled off the vinyl, and then lightly buffed the letters. Some of the paint did rub off, but we crafters like to call that "charm". Seriously, I did want some to come off, so it did look naturally worn.

And, I wanted it to look like someone was singing the ABC song, so I painted them accordingly (sing as you're reading them).


I wanted to include an artsy diagonal shot, but Google is telling me that I need to buy more storage space for my pics. I WILL find a way around this, PEEPS! ;)
Anyhoo, I hope you enjoyed this short little blurb.
Fondly, Tami
I'm linking up to:
Miss Mustard Seed


Thursday, July 12, 2012

A few more cute baby pics...

Hey, Froggers. Here are a few more pics for your viewing enjoyment. My daughter and I had SO much fun doing these, and Joshua really cooperated well!


I hope you like them!
Fondly, Tami

Tuesday, June 26, 2012

Baby Pictures Anyone Can Do

So, our friend came to visit. She has a newborn baby. My daughter and I had fun.


We took advantage of his newborn reflexes. We just put the strings in his hand and he grasped them.


We just looked around the house for simple props to match the ideas we had. My daughter had a collection of scarves and stuffed animals that came in handy.


My husband (yes- HUSBAND) had just made these German stars out of ribbon. Of course, we HAD to use them.


I admit that I saw something like this online. I can't remember where. Sorry. But, a lot of our ideas were original.
The key is to time this just right. Since our model was so young, we needed to take the pics when he was sleeping, after he had just eaten. Of course, the room needs to be warm. He loves to be bundled, so we obliged. ;)
We have SO many more ideas and we can't wait to try them out. Thanks, Joshua, for being such a good sport!
What ideas can YOU come up with?
Fondly, Tami
I'm linking to:
Crafty Confessions
Kammys Corner
A Diamond in the Stuff
The Tip Junkie
Savvy Southern Style
Stuff and Nonsense
Feathered Nest Friday 
Creative Me

Monday, June 18, 2012

Tired Two Tiered Table

Hey, Froggers! It's been a while since I've last posted, but life has been busy. I've been doing a lot of biking (the kind where my feet actually go around and around and around), and I'm finding that it's taking up a lot of time! My long rides used to be about 10-12 miles, but now I'm up to about 30. I'm pretty excited about my progress, but it's not without its aches and pains. Sheesh!
Here's my latest endeavor.


Got this beaut at benefit yard sale. It has seen better days. My pup, Jessie, is often by my side. She has had a coat of many colors.


My mom always told me to see the potential in something. I really had to use my imagination with this one. It sat in my garage for over a year (I know, I know) before I knew what to do with it.


And this is the final product.


I live in Lancaster County, and this is just a taste of what we're all about here. I used my favorite technique to dress it up.
Here's the top. I'm having lots of fun with the font package I bought a while back.


And, I needed to include a profile picture just for fun.


I want to keep this one as well (I know, I say that all the time) but alas, it will be going to my Howsewears space at BUiLDiNG CHARACTER.
And, it occurs to me that I haven't posted any recent pics of my business, so whether you like it or not, here they are. Sorry they're not the best. They were taken with my cell phone.


My space is rather tiny, but, along with custom orders, it keeps me busy enough for now.
And... if this post wasn't exciting enough, I have a little surprise. Remember my Pottery Barn knock off from this post? Well, I messed up came up with a brand new technique that is really cool! I can't wait to share it with you!
As usual, let me know what you think!
Fondly, Tami

I'm linking to:
Between Naps on the Porch
Under the Table and Dreaming
Sumo's Sweet Stuff
Craftomaniac
Today's Creative Blog
Coastal Charm
Stringtown Home
The Tip Junkie
Thrifty Decor Chick
The Trendy Treehouse
Domestically Speaking
My Uncommon Slice of Suburbia
Primitive and Proper
Miss Mustard Seed 
Sisters of the Wild West 
No Minimalist Here 
A Diamond in the Stuff 
My 1929 Charmer Blog 
Beyond the Picket Fence 
The 36th Avenue
Embracing Change
Elizabeth and Co. 
2805 
Simple Home Life 
The Southern Institute 
Knick of Time Interiors 
DIY by Design 
Primp Junktion

Tuesday, May 15, 2012

Book clock

Hey, Froggers. This is just a little project that I wanted to share. I'll tell you about it later, since the girls are home from college and life has gotten a little bit busier. TTFN!
 Fondly, Tami


Also, I'm linking up to Shabby Love for a wonderful little number sign giveaway. Check it out!

Monday, May 7, 2012

A Different Page Wreath- Tutorial

Hi, Froggers! I've been SO busy keeping up with my Howsewears business at Building Character, but I thought I'd stop and share a few things.
I've been making quite a few page wreaths lately, but this one is my all-time fave! I haven't seen one like this, and I thought I'd share how I did it.


This is my double page wreath. It is very simple to make, but it takes a LONG time, and requires a little patience. Believe me, since that is the case, if I can do it, anyone can.

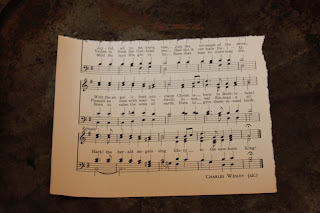
Firstly, I started with a half of a sheet of hymnal paper. I just folded it in half and ripped. I didn't want this to be "refined".


Then I rolled it up, pretty tightly. This is one stage that will make a difference as to how how "tight" your wreath looks. I wanted it to be dense, so I kept my tubes pretty well rolled.


Locate the inside edge.


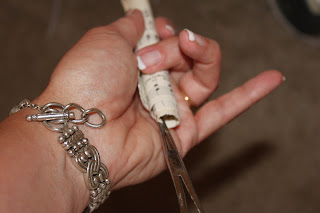
Grab the edge with pliers or a hemostat (which I happen to have from my RN days).


Gently pull the roll from the center with your clamp on your right hand, while unrolling the top of the tube with your left hand. This part takes a little practice, but once you get the hang of it, you can whip them off in no time.


Put a small bead of glue on the outside corner. Press and hold until the glue sets.


Make sure you're using a quick setting glue. I like to use Glossy Accents. It's my favorite go-to glue for most of my gluing needs.


I would suggest NOT using a glue gun. Because you have to hold the cone until it is stable, you WILL burn yourself. I hate it when that happens!
Put a small bead of glue along the side of the cone.


Press the side of the first cone to the side of a second one that you rolled up while watching TV.


Keep doing this until you make a full circle. I prefer to glue 5 or 6 to each other, then glue that set to another set. Then it doesn't get too cumbersome.
Once it starts getting larger, you're going to need to work on a flat surface, aka, get up off of your duff, move to the kitchen table or your craft room (if you're fortunate enough to have one), and glue it all together there. I then glued a piece of cardboard to the back to stabilize it. The piece on the back also serves to hold the hanger (which is just a piece of looped ribbon or cording glued to the top of the cardboard, centered, of course).

I'm sorry I don't have pics of the next stages. Basically, you're going to have a big, somewhat circular hole in the center. It doesn't matter if the points don't come perfectly together, because you're going to cover it up with something like this:


Yep, Peeps. This is so fancy and expensive, I just can't stand it. It's two layers of cereal boxes, glued together. It's smudged in black because I painted black paint on the outside edges.

Just to prove it to you, here's the back of it. My neighbors save all of their boxes for me. I just cut them apart and then use my Black Cat Cougar to cut it out. If you don't have a personal cutting machine, that's fine. You can just use Google images to find a shape that you like, trace it, cut two pieces out with scissors, and glue them together.


I painted the front side black, glued a mirror to it (I made the cereal box shape larger than the mirror so some of the scallop would show), and then glued that to the center of the wreath.

This scalloped cereal box backing is just a little different. 


In order to make a double wreath, just layer a smaller one on top of a larger one. I made the smaller one the same way as the larger, only I tore my hymnal pages into quarters instead of halves.


I'm really tickled with this, which is why I decided to keep it instead of selling it. I'm allowed to keep something, aren't I???


I crackled the finish with some Ranger Rock Candy Distress Crackle Paint. Love this stuff!


Let me know if you enjoyed this tute by leaving a comment, please! I love hearing from y'all!
Fondly, Tami
I'm linking to:
My 1929 Charmer Blog
Sumo's Sweet Stuff
Between Naps on the Porch
Craftomaniac
Under the Table and Dreaming
Homemaker on a Dime
Skip to my Lou
The Brambleberry Cottage 
Savvy Southern Style 
Tatertots and Jello
Be Different, Act Normal
I Heart Naptime
Funky Junk Interiors 
Nifty Thrifty Things 
Sisters of the Wild West 
Craft Envy 
Petite Hermine 
Hope Studios 
733 Blog 
Kampenlane
No Minimalist Here 
The Shabby Creek Cottage
Primitive and Proper
The Southern Institute 
Today's Creative Blog 
The Dedicated House 
PJH Designs
Stringtown Home
Jennifer Rizzo
Mad Skills Party
Flamingo Toes