Wednesday, April 22, 2015

Stencil Sale!!!

Hey, Peeps. I have a new sale in my shop. Use coupon code Stencilsale20 at checkout with a minimum purchase of $15 and you will receive 20% off of all stencils. 
I have a wide variety of stencils (over 150 designs), including tag stencils (perfect for A10 tags), masks (great for Gelli printing), and ATC stencils. 
Check it out at www.howsewears.etsy.com

Here are some new stencils just listed within the last few weeks:


So, have fun shopping! 
Fondly, Tami

Thursday, March 5, 2015

Clean Your Craft Mat With Skin Peelings- Part II


Hey, Peeps. Here's the long, drawn-out sequel to Part I of "Clean Your Craft Mat With Skin Peelings, Part I", which was here.


Here is the final piece, still stuck on the mat, but dried. The extra heavy gloss gel medium dried beautifully clear.


The reason to lay it on extra thick (see part I) is so that it has "substance" when it's peeled off of the mat. Here you can see that there's something for my credit card to "grab" onto to get the peeling started.


Just find the edge and push to gather it slightly. I did this all around the perimeter of the design.


Here, you can see the edge.


Honestly, Froggers, I didn't expect that this would all come up as one piece. It's about 9x11 inches or so. I thought it would rip or tear at some point, but I must have done a whiz-bang job of laying down the gel medium, because I had absolutely no problem keeping it all together. I just pulled it off slowly and carefully. Here it is, placed on top of a piece of white paper.


There is just SO much yummy goodness.


Here, you can see the hand-carved stamped images.


More hand-carved stamp images as well as painted doodles.


Texture and layers.


And more glittery goodness.


And, because this is essentially "plastic", when you store it, make sure to put it in between two pieces of waxed paper and make sure it stays flat. And, don't let it fold in on itself. You might be able to pry it apart, but I don't make any guarantees.

So, what will I do with this?
Here are some ideas:
Die cutting- I would cut this into smaller pieces (I know- perish the thought!!!), place a piece between two pieces of paper, and run it through my Big Shot.
Cards- cut this into smaller pieces and collage onto cards, perhaps using some patterned paper underneath. I would use gel medium to glue it down, but if I used gel medium on top, I would definitely use gloss, since matte would dull it, and it's SO pretty in its shiny state.
Canvas- need I say more? This would look so pretty on a canvas with some embellies like flowers, buttons, etc.
As a layer on any other substrate, like laminate samples (see my blog post here), tags, old pieces of wood, wooden clipboards, etc., etc.
As a layer on top of gelli prints.
And on, and on, and on. 
When I get the nerve to cut this up, I'll show you sometime, K?
Again, thanks for visiting. 
Fondly, Tami


Tuesday, March 3, 2015

Declare and Dash

Hey, Froggers. I'm putting myself on an actual schedule today! I really am! So, here's a Declare and Dash post. I have LOTS of new stencils in the shop, so feel free to check them out in my Etsy shop here.

This tag stencil is super for Bible journaling, midori journals, personal planners, and a variety of other mixed media projects.


This one is particularly fun with the Gelli® plate. I hope to have some samples to show you in the next few days.


This "Fanned" stencil comes in 6x6, 8x8, or 10x10 inches.


Sorry to say it, Froggers, but this is another one of my faves. You can all of it or just parts of this "Filigree Arrow" stencil in your journals, doodling, midori notebooks, Bible journals, etc. 


And I'll say it again, these tag stencils are PERFECT for traveling, like waiting in the Drs.' office, riding in the car, flying in a plane, or just pretending you're on an island in the tropics. Yeah, I like that last one.


And, here is my "Surround" tag stencil.
I'm having way too much fun.


That's it for today. 
And again, thanks for visiting! 
Now, on to keeping my schedule. Yups. I'm gonna do it! I swear!
Fondly, Tami

Wednesday, February 25, 2015

Leather Mini Gelli Journal

Hey, Froggers. Whoo-wee! It's been a busy time. 
I'm sorry for the delay for the Part II of "Clean Your Craft Mat With Skin Peelings." Part I can be found here, and I promise to try to get Part II written within the next few days. However, it did turn out really COOL!
I've been wanting to try my hand at sewing a simple binding on a journal, and I came up with this little Gelli Print journal. 
I had a leather sample that was the perfect size- about 5x7". 


I made a signature of 4 pieces of mixed media paper of Gelli prints that I had printed a few weeks ago.


Two pieces were smaller than the other two, but I was OK with that. I just put them in the center.


There was no rhyme or reason to my patterns. I mainly just used colors that I liked and my stencils that can be found in my Etsy shop here. If you haven't visited my shop, I encourage you to look at some of the very cool designs that I have created, especially the mask medallions that I made especially for the plate. Here's a sample:


I wanted to do a very simple stitch since this was my first stitched journal. The one I ended up doing is called a 5-hole pamphlet stitch. I found some instructions here. This is absolutely the simplest stitch. I didn't have linen thread, so I used waxed thread that I bought in the jewelry section of my local crack craft store.
Since the mixed media paper is quite sturdy, the book doesn't stay closed on its own, so I tucked a long piece of hand-dyed crinkle ribbon into one of the loops to secure it. That way, I can tie the book closed.


Because there was a big grommet in the front (after all, it WAS a sample), I covered it up with a die cut leather flower, added a vintage button, and swiped it with a little bit of white gesso. Of course, I just HAD to stamp it with a hand carved stamp. This one is my key logo for my shop. 


So, what would YOU put in this little journal? I'm thinking a few fave scriptures with a little bit of embellishing, drawing, or doodling, perhaps about God's promises, or things He is teaching me about myself. Hmmm?
Thanks again for stopping by!
Fondly, Tami

Sunday, February 1, 2015

Clean Your Craft Mat With Skin Peelings- Part I

Hey, again, Froggers! I've been playing with skins again, taking them to a different level.
This is a great and very *artistic* way to clean your non-stick craft sheet. 
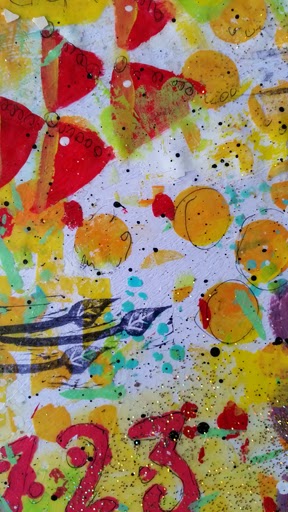
Start with a very painterly mat like this.


Drip some Liquitex Gel Medium onto your mat, making sure to cover all of your icky painted areas.


Spread out a "medium thickness". You can use a brush or an old key card or your fingers. Just make sure your layer is a fairly even thickness.


It should look really bad...like this.


And this.


This next step is very important. Dry the entire area with a craft dryer. Don't get too close to the medium or it might bubble.


Then start with your favorite craft stencils. I used my tag stencils. Using the stencils, paint on top of the dried gel medium.
Here, I used my Plain Circles tag stencil.


I think circles always add a little whimsy. 


Again, dry between layers of paint, unless of course, you want to mix them. In this case, I didn't want to do that.


And using my Chevron tag stencil...


...and my Data tag stencil...


...and my grungy Grater tag stencil...


...and my Funky Numbers stencil...


...with layers and layers...


...and hand-painted elements...


 ...and doodles and outlines with PERMANENT markers (here I used a Sharpie marker, but ONLY after my paint was completely dried between layers)...


...and some more hand-painted doodles with highlights...


...and don't forget the hand-carved stamps. Remember to use PERMANENT ink. Here, I used black archival ink from Ranger.


I also took a credit card and just picked up some paint along the edge.


And made hash marks with the credit card.


And whatever you do, DON'T FORGET THE SPATTERS! I used my fan brush and watered down some black paint, and then I tapped my brush over my painted areas.


Spatters make the piece dynamic, giving lots of motion.


When you're happy with your design, spread a thick, even layer of gloss (or matte) extra heavy gel medium on top of the entire design.


I used a credit card to guide the medium on top. If some areas seemed too thin, I just went back with my finger and added more medium.


It should look good and white and thick like this.


If you'd like to add glitter, this is the time to add it. I sprinkled a little bit of glitter and fragments on top.


This is the hardest part of the whole process- waiting.
Yups. You have to wait for the gel medium to dry. I'm waiting overnight.
And, here's the cliff hanger, Froggers. 
You have to wait until tomorrow to see what happens next. Because it's drying as we speak.
Stay tuned. 
Fondly, Tami

P.S. If you are interested in any of my stencils or some of my hand-carved stamps, please feel free to visit my Etsy shop here.