Showing posts with label Heavy Bodied Acrylics. Show all posts

Thursday, March 5, 2015

Clean Your Craft Mat With Skin Peelings- Part II


Hey, Peeps. Here's the long, drawn-out sequel to Part I of "Clean Your Craft Mat With Skin Peelings, Part I", which was here.


Here is the final piece, still stuck on the mat, but dried. The extra heavy gloss gel medium dried beautifully clear.


The reason to lay it on extra thick (see part I) is so that it has "substance" when it's peeled off of the mat. Here you can see that there's something for my credit card to "grab" onto to get the peeling started.


Just find the edge and push to gather it slightly. I did this all around the perimeter of the design.


Here, you can see the edge.


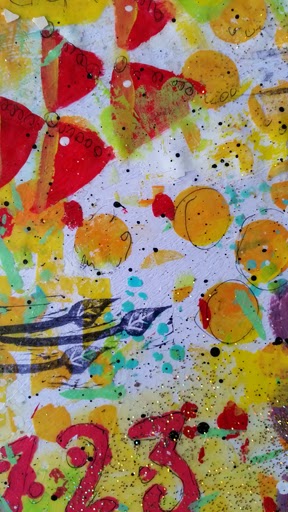
Honestly, Froggers, I didn't expect that this would all come up as one piece. It's about 9x11 inches or so. I thought it would rip or tear at some point, but I must have done a whiz-bang job of laying down the gel medium, because I had absolutely no problem keeping it all together. I just pulled it off slowly and carefully. Here it is, placed on top of a piece of white paper.


There is just SO much yummy goodness.


Here, you can see the hand-carved stamped images.


More hand-carved stamp images as well as painted doodles.


Texture and layers.


And more glittery goodness.


And, because this is essentially "plastic", when you store it, make sure to put it in between two pieces of waxed paper and make sure it stays flat. And, don't let it fold in on itself. You might be able to pry it apart, but I don't make any guarantees.

So, what will I do with this?
Here are some ideas:
Die cutting- I would cut this into smaller pieces (I know- perish the thought!!!), place a piece between two pieces of paper, and run it through my Big Shot.
Cards- cut this into smaller pieces and collage onto cards, perhaps using some patterned paper underneath. I would use gel medium to glue it down, but if I used gel medium on top, I would definitely use gloss, since matte would dull it, and it's SO pretty in its shiny state.
Canvas- need I say more? This would look so pretty on a canvas with some embellies like flowers, buttons, etc.
As a layer on any other substrate, like laminate samples (see my blog post here), tags, old pieces of wood, wooden clipboards, etc., etc.
As a layer on top of gelli prints.
And on, and on, and on. 
When I get the nerve to cut this up, I'll show you sometime, K?
Again, thanks for visiting. 
Fondly, Tami


Friday, May 30, 2014

Save Your Money on Craft Supplies

Hey, Peeps. I've been thinking a lot about how us Mixed Media People love our junk supplies, and how we love to hoard collect stuff to use in our projects. I've also been thinking about products on the market, and how they are marketed to us suckers intelligent consumers. 

I went to one of my favorite Small Local Craft Stores. Believe me, there's nothing like them. I love that they carry cool products that the Big Craft Conglomerates don't. I like that I'm supporting them in feeding their families, not buying their next BMW. 

However, when I visited my Local Craft Store, I chatted with the owner, as I SO often do. She had been at a recent craft and hobby trade show. She was very excited about a new line of mixed media heavy bodied acrylic paint that had come on the market through a Large Company, that most of us know and quite frankly, idolize. 

So, I decided to try this paint. I bought a tube of it in a color that I really liked I didn't really have yet, which was a lime green color. That night, I watched a few videos from the Craft and Hobby Association where this paint was being featured. There were many qualities that this paint had, so I was excited to try it out. 

The next day, I played with it. As I collaged, I pulled a bottle of a different color and brand. As I squirted the aqua onto my craft mat, I noticed something. It appeared to have the same properties as the lime green color that was touted as being wonderful. 

So, I decided to experiment. Keep in mind that this experiment was less than scientific, but it was good enough by my standards. Technically, I should have compared the same color to it, but I didn't have it, remember? I also am not paid by anyone to do this, but if you want to pay me, that would be fine, too. 

I am not showing the Expensive Paint container, but here's the brand below to which I compared it. This is a multi-surface paint that I bought, mainly because I liked the color and wanted to try it out. It was $1.39 (without a coupon). The Expensive Paint was $5.99.


I squirted the paints side by side. They were of the same consistency (oops, I forgot a picture, but imagine two blobs on a craft mat, with gently formed peaks).

I painted them onto a piece of mixed media paper. They spread equally as well and had the same coverage.


Next, I painted circles onto a piece of plain paper from my printer (of course, I had to print something onto it, which is a copy of a deed from my grandparents' farm). They spread the same. Here you can see that the lime green color is slightly more translucent, but I would guess that that's because it's a lighter color. 


Here, I spread both paints and inscribed into them with the non-brush tip of my paint brush. Since the lime green colored paint was touted as being a great consistency, I wanted to see how the Folk Art paint held up. Both inscribed well. 


Then, I painted onto a surface that had been colored with gesso. They both also spread the same.


But wait! Perhaps the Expensive Paint would work better through a mask. Alas, it did not. Here, I used both on my Loopdeeloop mask, and as you can see, both worked well. 


So, why did I do this? I think the main reason was to empower you wonderful Mixed Media Artists to think before you buy. Is the value of what your buying really a good value? In this case, the less expensive paint is just as good, is a better value, and has a larger palate of colors. 
Will I go back to my Small Local Craft Store? Absolutely. But, I will buy fun hardware and embellishments that I can't make myself, instead. 

And, you know those shoes that you have in your closet that have a crack in the sole and water filters up and wets your dry socks? Yups. Those. Well, cut them up, add vintage buttons, and use them in your projects. 


As usual, thanks for checking in. Fondly, Tami