Hi, Froggers! I've been SO busy keeping up with my Howsewears business at Building Character, but I thought I'd stop and share a few things.
I've been making quite a few page wreaths lately, but this one is my all-time fave! I haven't seen one like this, and I thought I'd share how I did it.

This is my double page wreath. It is very simple to make, but it takes a LONG time, and requires a little patience. Believe me, since that is the case, if I can do it, anyone can.
Firstly, I started with a half of a sheet of hymnal paper. I just folded it in half and ripped. I didn't want this to be "refined".
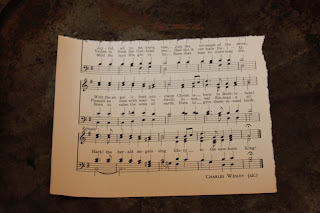
Then I rolled it up, pretty tightly. This is one stage that will make a difference as to how how "tight" your wreath looks. I wanted it to be dense, so I kept my tubes pretty well rolled.

Locate the inside edge.

Grab the edge with pliers or a hemostat (which I happen to have from my RN days).
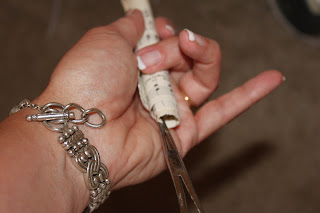
Gently pull the roll from the center with your clamp on your right hand, while unrolling the top of the tube with your left hand. This part takes a little practice, but once you get the hang of it, you can whip them off in no time.

Put a small bead of glue on the outside corner. Press and hold until the glue sets.

Make sure you're using a quick setting glue. I like to use Glossy Accents. It's my favorite go-to glue for most of my gluing needs.

I would suggest NOT using a glue gun. Because you have to hold the cone until it is stable, you WILL burn yourself. I hate it when that happens!
Put a small bead of glue along the side of the cone.

Press the side of the first cone to the side of a second one that you rolled up while watching TV.

Keep doing this until you make a full circle. I prefer to glue 5 or 6 to each other, then glue that set to another set. Then it doesn't get too cumbersome.
Once it starts getting larger, you're going to need to work on a flat surface, aka, get up off of your duff, move to the kitchen table or your craft room (if you're fortunate enough to have one), and glue it all together there. I then glued a piece of cardboard to the back to stabilize it. The piece on the back also serves to hold the hanger (which is just a piece of looped ribbon or cording glued to the top of the cardboard, centered, of course).
I'm sorry I don't have pics of the next stages. Basically, you're going to have a big, somewhat circular hole in the center. It doesn't matter if the points don't come perfectly together, because you're going to cover it up with something like this:

Yep, Peeps. This is so fancy and expensive, I just can't stand it. It's two layers of cereal boxes, glued together. It's smudged in black because I painted black paint on the outside edges.
Just to prove it to you, here's the back of it. My neighbors save all of their boxes for me. I just cut them apart and then use my Black Cat Cougar to cut it out. If you don't have a personal cutting machine, that's fine. You can just use Google images to find a shape that you like, trace it, cut two pieces out with scissors, and glue them together.

I painted the front side black, glued a mirror to it (I made the cereal box shape larger than the mirror so some of the scallop would show), and then glued that to the center of the wreath.
This scalloped cereal box backing is just a little different.

In order to make a double wreath, just layer a smaller one on top of a larger one. I made the smaller one the same way as the larger, only I tore my hymnal pages into quarters instead of halves.

I'm really tickled with this, which is why I decided to keep it instead of selling it. I'm allowed to keep something, aren't I???

I crackled the finish with some Ranger Rock Candy Distress Crackle Paint. Love this stuff!


Let me know if you enjoyed this tute by leaving a comment, please! I love hearing from y'all!
Fondly, Tami
I'm linking to:
My 1929 Charmer Blog
Sumo's Sweet Stuff
Between Naps on the Porch
Craftomaniac
Under the Table and Dreaming
Homemaker on a Dime
Skip to my Lou
The Brambleberry Cottage
Savvy Southern Style
Tatertots and Jello
Be Different, Act Normal
I Heart Naptime
Funky Junk Interiors
Nifty Thrifty Things
Sisters of the Wild West
Craft Envy
Petite Hermine
Hope Studios
733 Blog
Kampenlane
No Minimalist Here
The Shabby Creek Cottage
Primitive and Proper
The Southern Institute
Today's Creative Blog
The Dedicated House
PJH Designs
Stringtown Home
Jennifer Rizzo
Mad Skills Party
Flamingo Toes
I've been making quite a few page wreaths lately, but this one is my all-time fave! I haven't seen one like this, and I thought I'd share how I did it.

This is my double page wreath. It is very simple to make, but it takes a LONG time, and requires a little patience. Believe me, since that is the case, if I can do it, anyone can.
Firstly, I started with a half of a sheet of hymnal paper. I just folded it in half and ripped. I didn't want this to be "refined".

Then I rolled it up, pretty tightly. This is one stage that will make a difference as to how how "tight" your wreath looks. I wanted it to be dense, so I kept my tubes pretty well rolled.

Locate the inside edge.

Grab the edge with pliers or a hemostat (which I happen to have from my RN days).

Gently pull the roll from the center with your clamp on your right hand, while unrolling the top of the tube with your left hand. This part takes a little practice, but once you get the hang of it, you can whip them off in no time.

Put a small bead of glue on the outside corner. Press and hold until the glue sets.

Make sure you're using a quick setting glue. I like to use Glossy Accents. It's my favorite go-to glue for most of my gluing needs.

I would suggest NOT using a glue gun. Because you have to hold the cone until it is stable, you WILL burn yourself. I hate it when that happens!
Put a small bead of glue along the side of the cone.

Press the side of the first cone to the side of a second one that you rolled up while watching TV.

Keep doing this until you make a full circle. I prefer to glue 5 or 6 to each other, then glue that set to another set. Then it doesn't get too cumbersome.
Once it starts getting larger, you're going to need to work on a flat surface, aka, get up off of your duff, move to the kitchen table or your craft room (if you're fortunate enough to have one), and glue it all together there. I then glued a piece of cardboard to the back to stabilize it. The piece on the back also serves to hold the hanger (which is just a piece of looped ribbon or cording glued to the top of the cardboard, centered, of course).
I'm sorry I don't have pics of the next stages. Basically, you're going to have a big, somewhat circular hole in the center. It doesn't matter if the points don't come perfectly together, because you're going to cover it up with something like this:

Yep, Peeps. This is so fancy and expensive, I just can't stand it. It's two layers of cereal boxes, glued together. It's smudged in black because I painted black paint on the outside edges.
Just to prove it to you, here's the back of it. My neighbors save all of their boxes for me. I just cut them apart and then use my Black Cat Cougar to cut it out. If you don't have a personal cutting machine, that's fine. You can just use Google images to find a shape that you like, trace it, cut two pieces out with scissors, and glue them together.

I painted the front side black, glued a mirror to it (I made the cereal box shape larger than the mirror so some of the scallop would show), and then glued that to the center of the wreath.
This scalloped cereal box backing is just a little different.

In order to make a double wreath, just layer a smaller one on top of a larger one. I made the smaller one the same way as the larger, only I tore my hymnal pages into quarters instead of halves.

I'm really tickled with this, which is why I decided to keep it instead of selling it. I'm allowed to keep something, aren't I???

I crackled the finish with some Ranger Rock Candy Distress Crackle Paint. Love this stuff!


Let me know if you enjoyed this tute by leaving a comment, please! I love hearing from y'all!
Fondly, Tami
I'm linking to:
My 1929 Charmer Blog
Sumo's Sweet Stuff
Between Naps on the Porch
Craftomaniac
Under the Table and Dreaming
Homemaker on a Dime
Skip to my Lou
The Brambleberry Cottage
Savvy Southern Style
Tatertots and Jello
Be Different, Act Normal
I Heart Naptime
Funky Junk Interiors
Nifty Thrifty Things
Sisters of the Wild West
Craft Envy
Petite Hermine
Hope Studios
733 Blog
Kampenlane
No Minimalist Here
The Shabby Creek Cottage
Primitive and Proper
The Southern Institute
Today's Creative Blog
The Dedicated House
PJH Designs
Stringtown Home
Jennifer Rizzo
Mad Skills Party
Flamingo Toes